Freezing Bell Peppers

Do you have more peppers than you can handle? Do you, like me, feel terrible when food goes to waste? Bumper crops are a blessing…until they leave you overwhelmed, frantically scrolling through recipes, searching for ways to use them. If these truths are hitting home for you, it’s time to make use of your freezer, my friend.

Super Simple Process

The great thing about bell peppers is that you can freeze them with very little preparation. Just grab a knife, cutting board, and baking sheet, and get started!

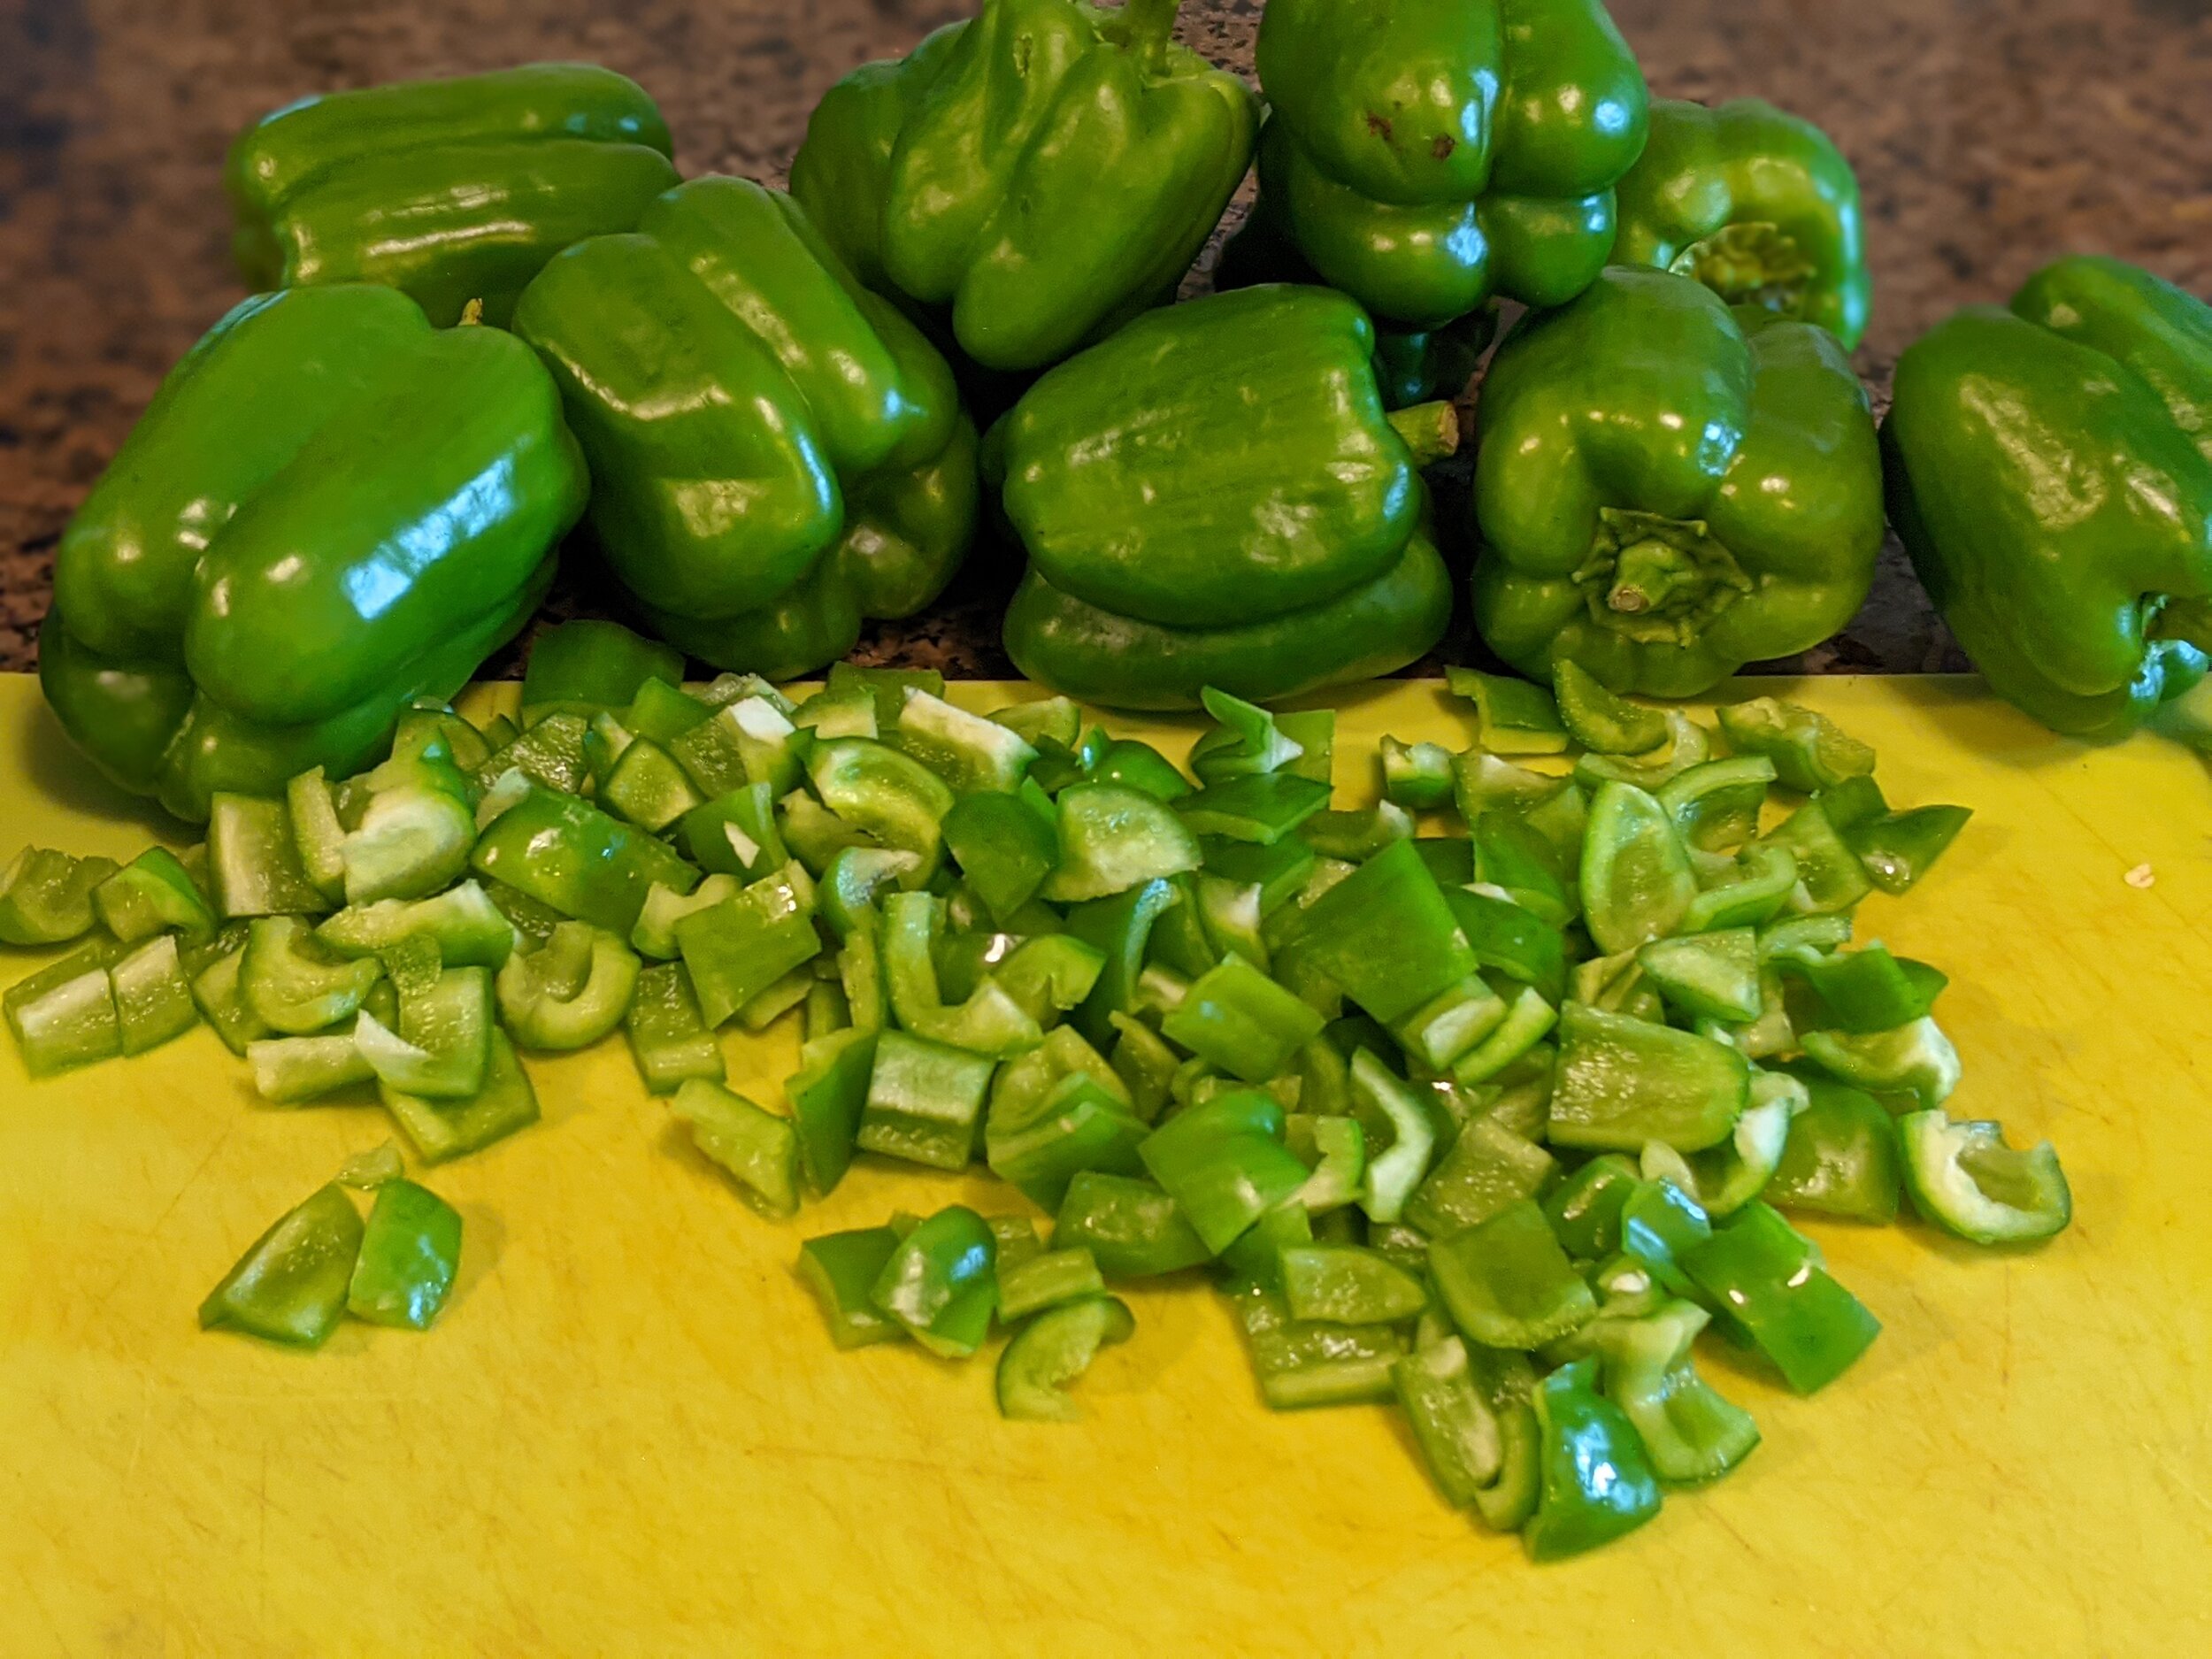
Step 1: Rinse and dry your peppers.

Step 2: Chop up your peppers however your little heart desires.

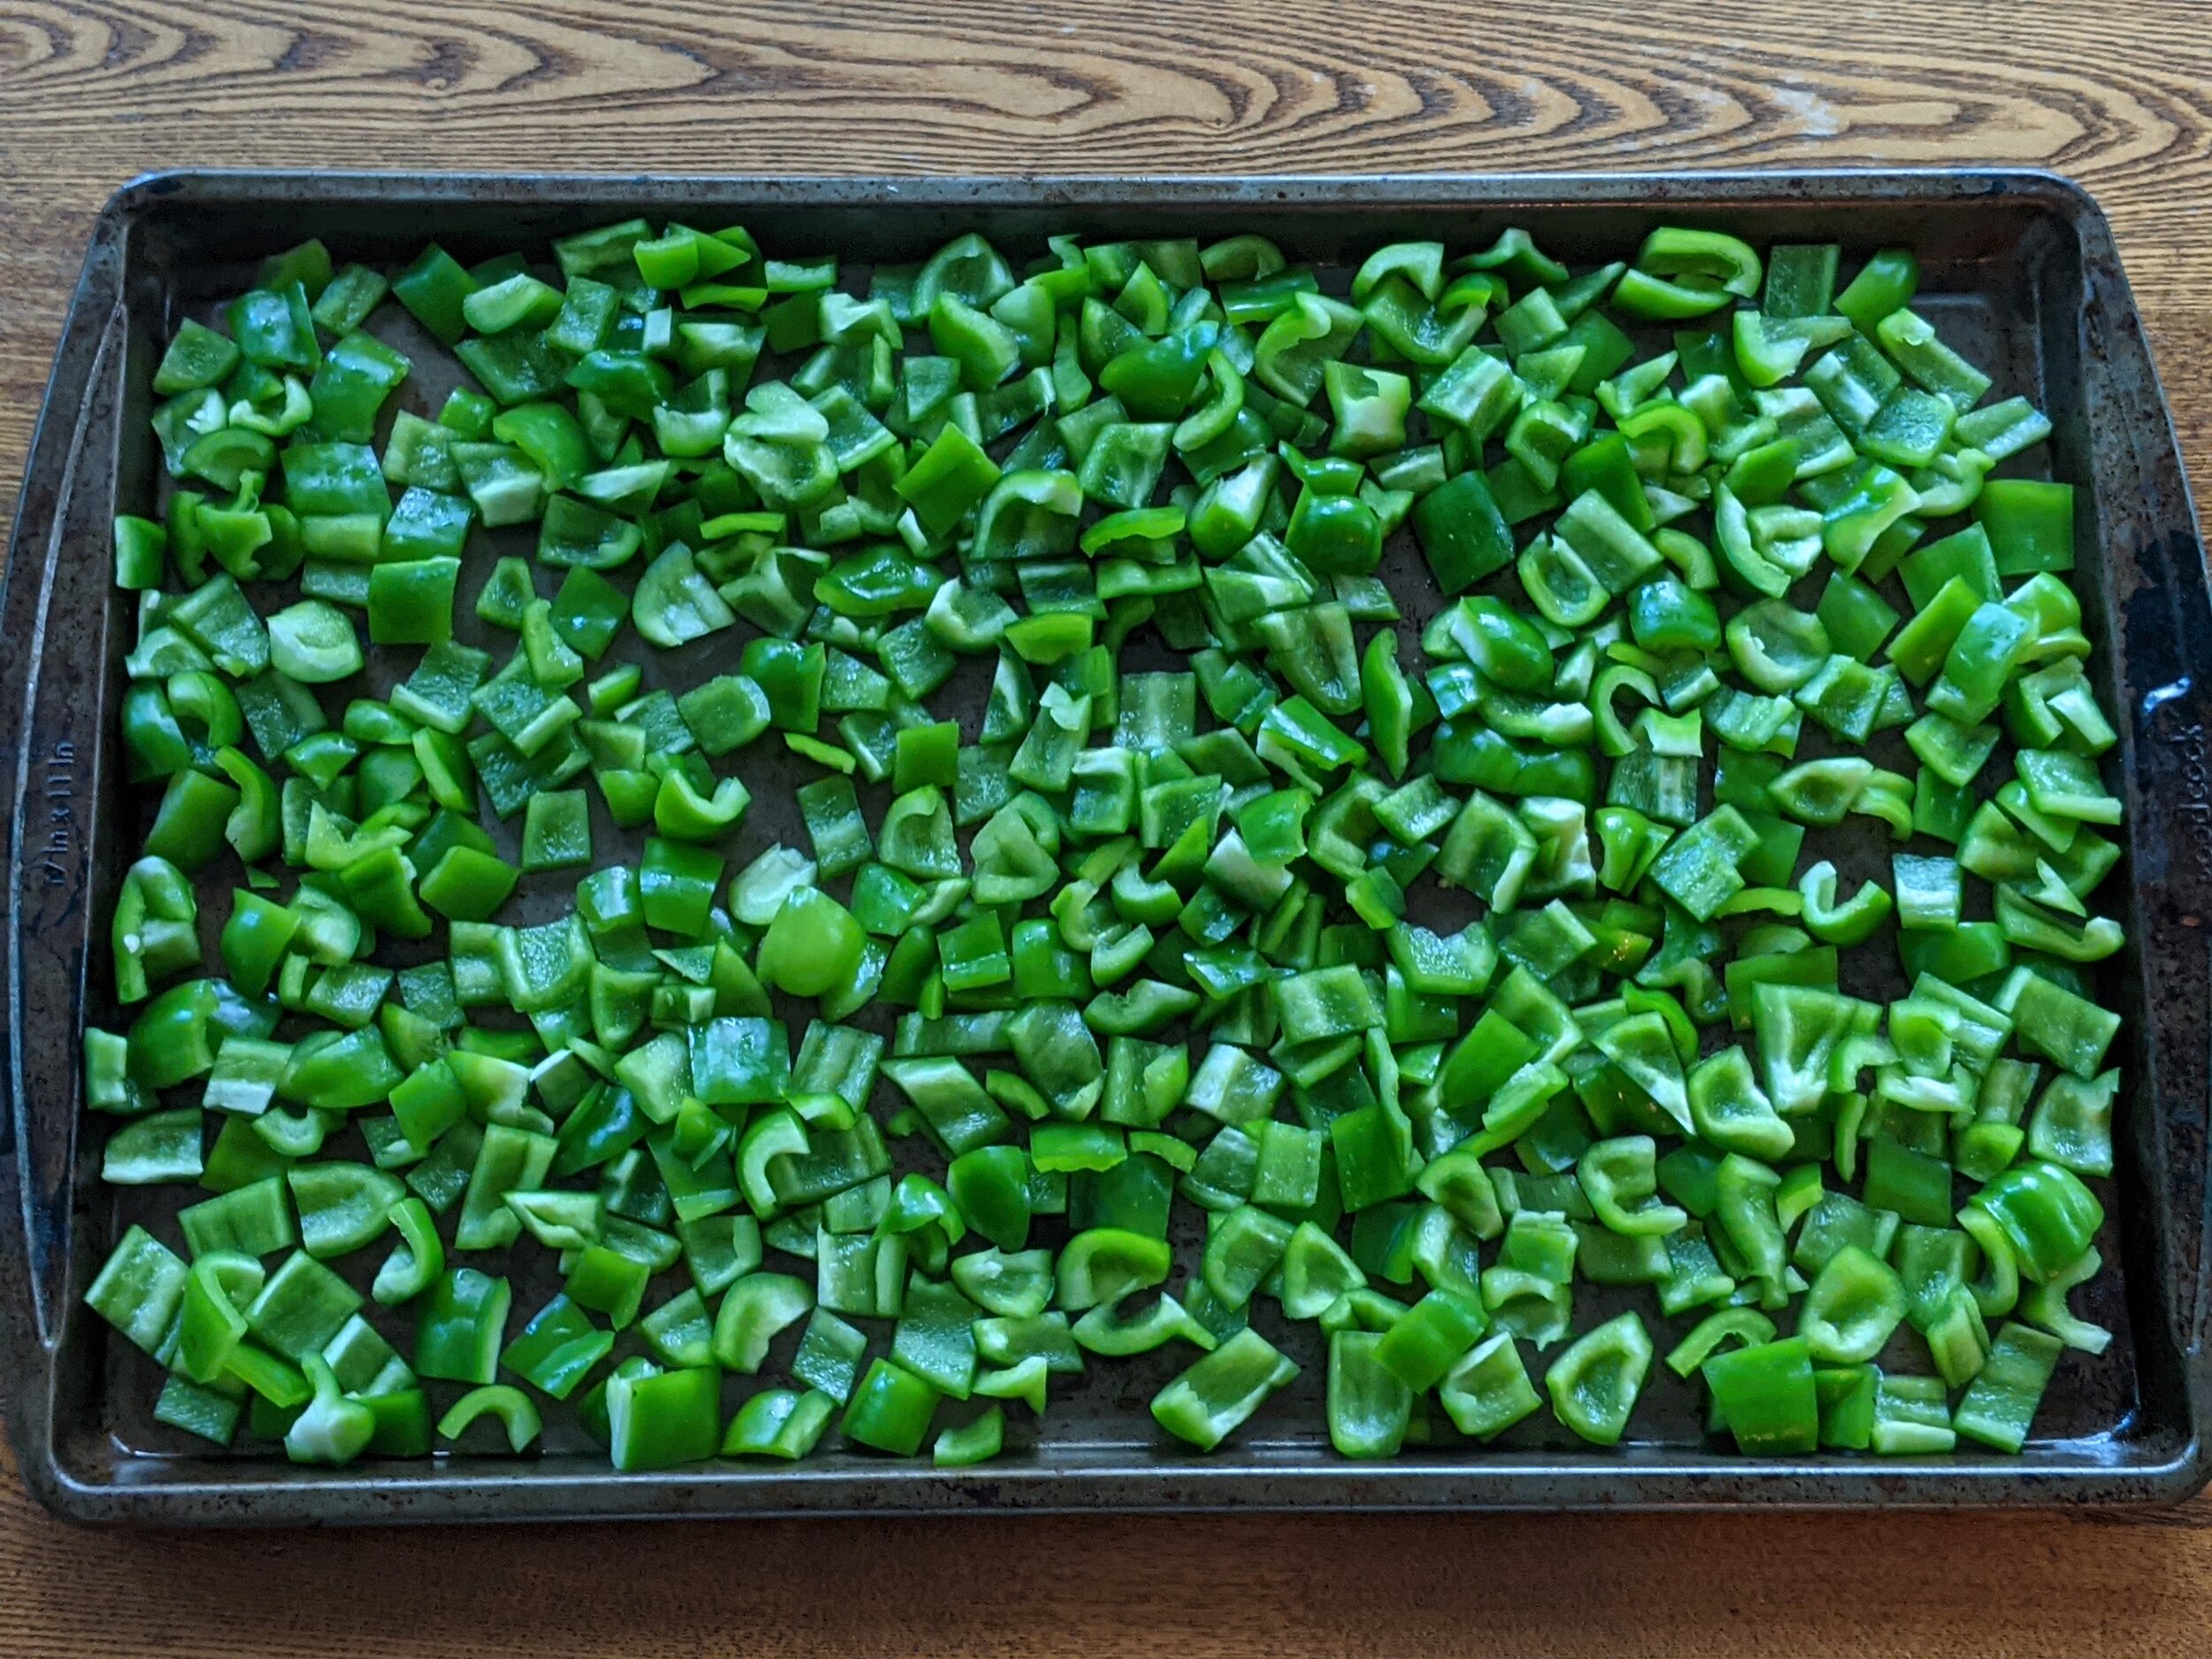
Step 3: Spread the chopped peppers out on a baking sheet.

Step 4: Throw the baking sheet into your freezer for about an hour.

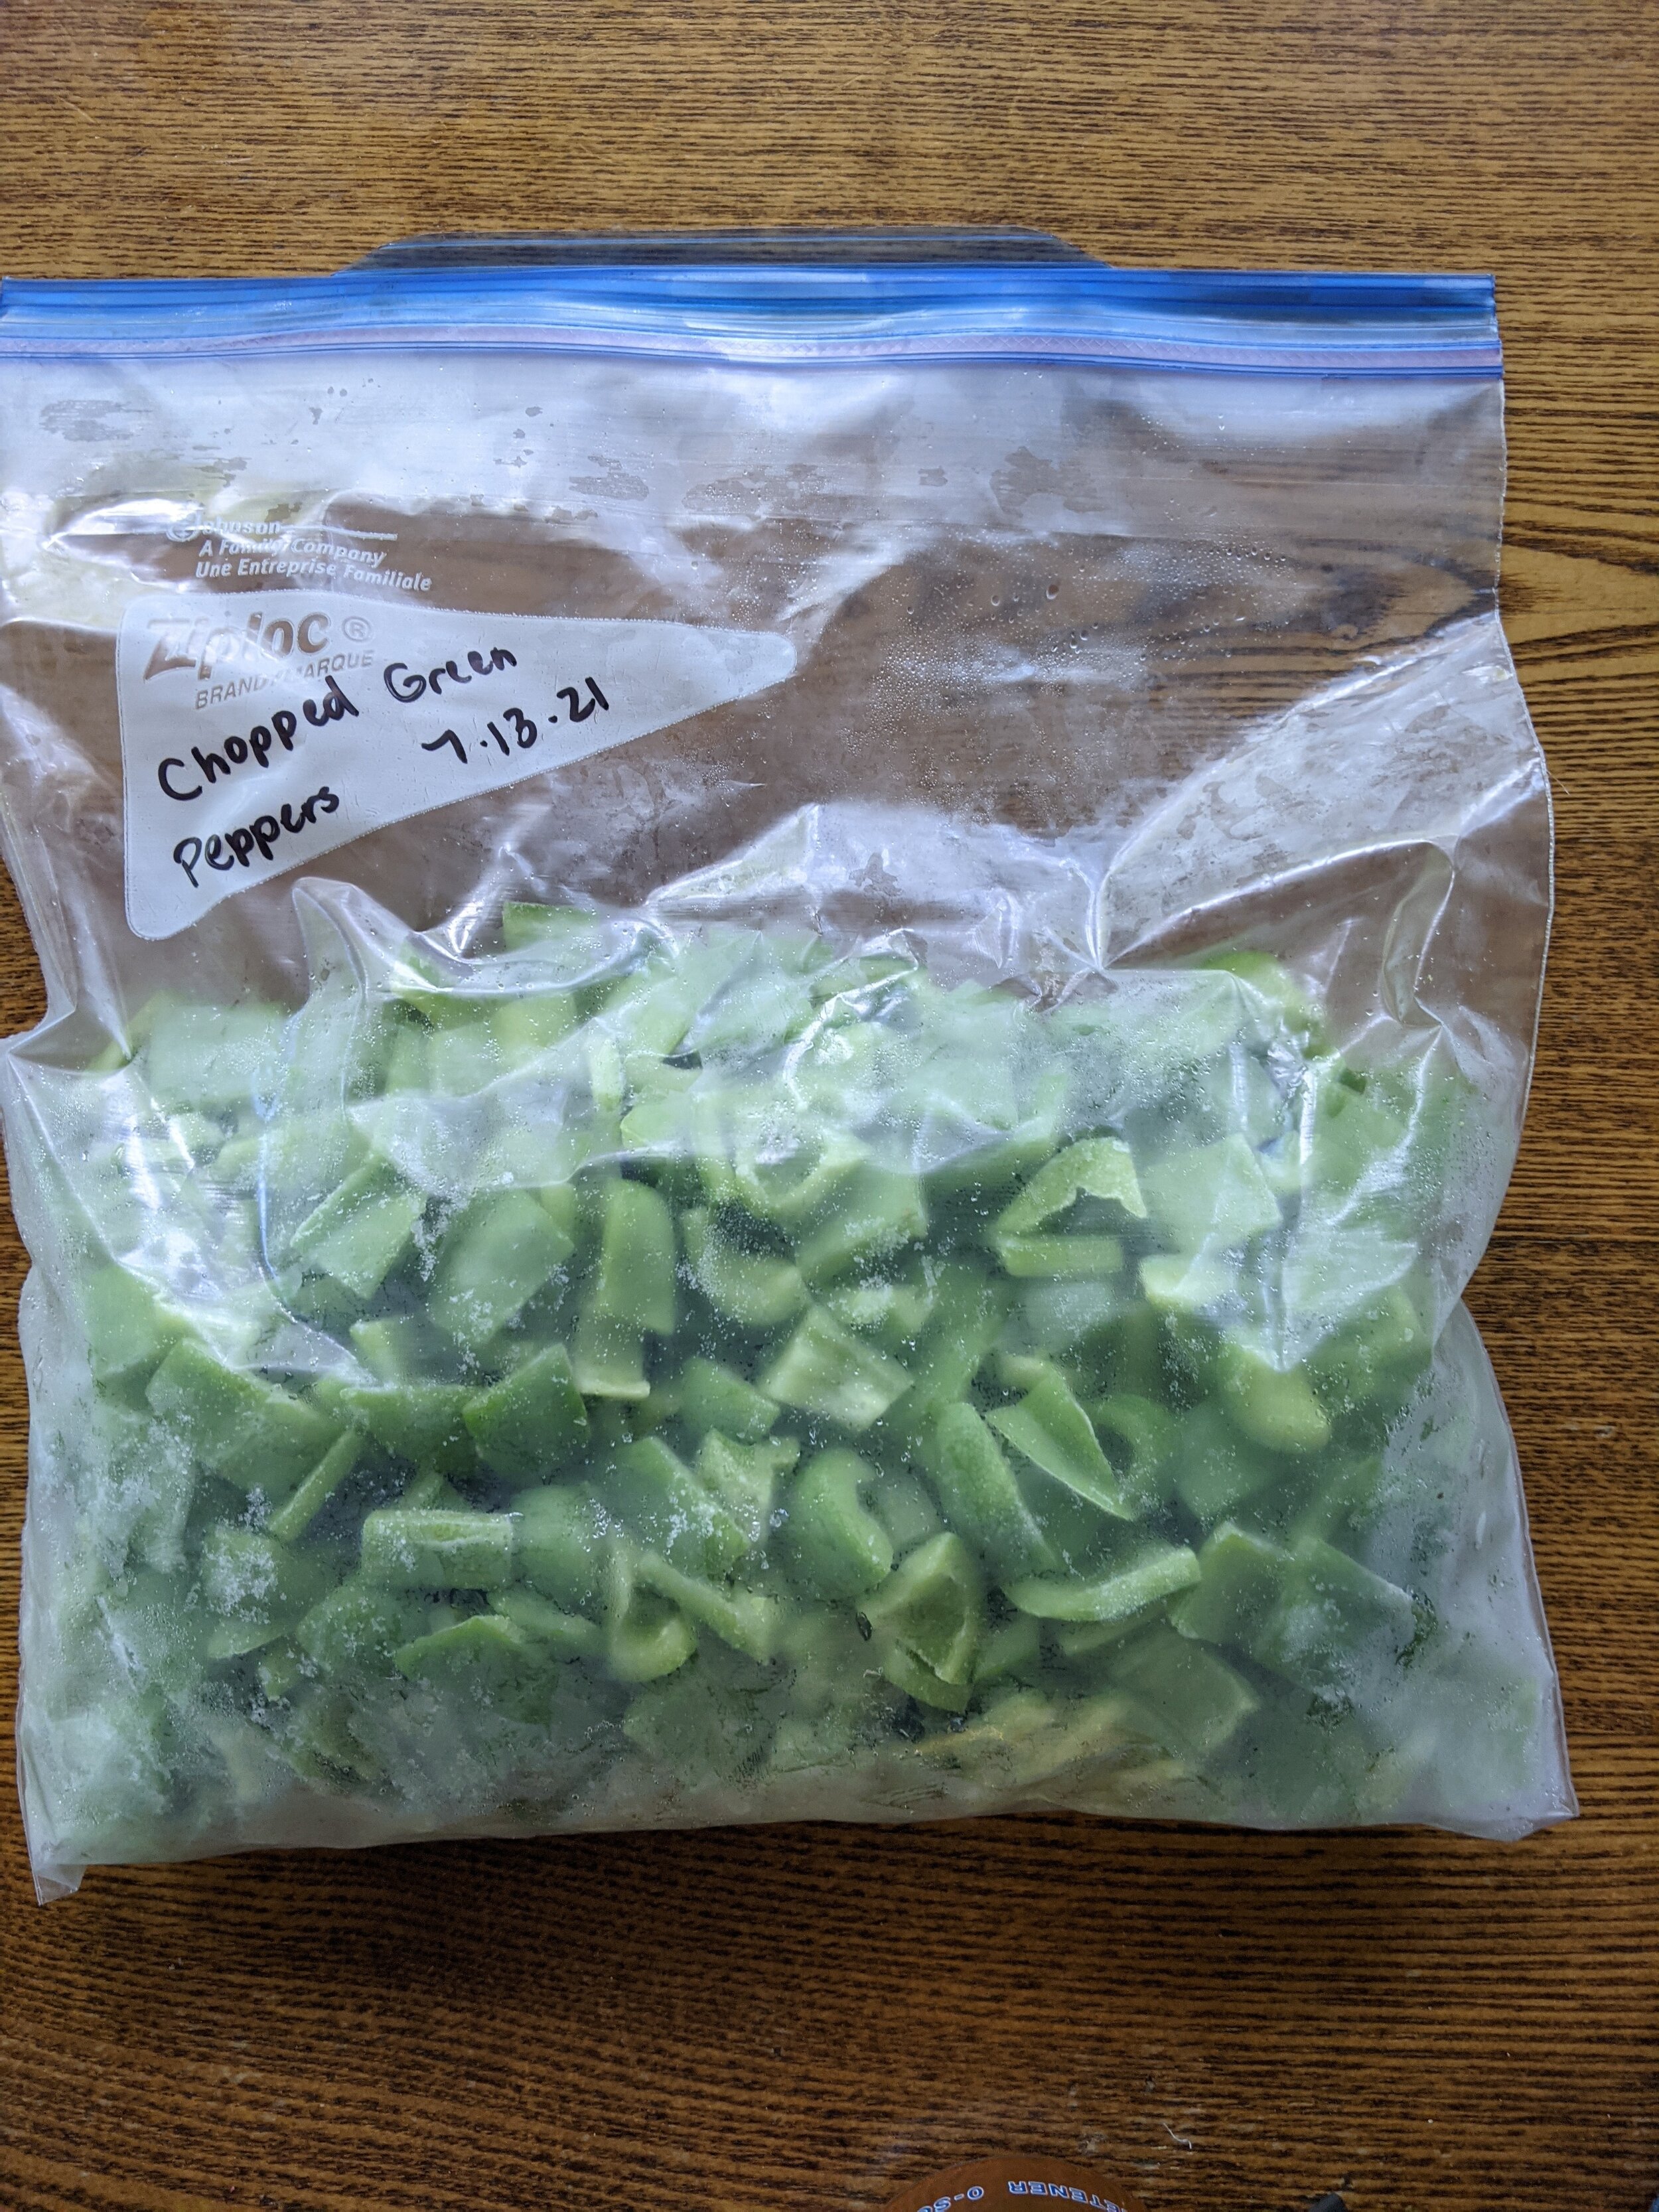
Step 5: Store the frozen chopped peppers in a freezer bag in your freezer until you need them.

Using Frozen Peppers

I cook with frozen peppers pretty much exactly the way I would raw peppers, except that I allow for slightly more cooking time. Because the peppers bits are frozen individually on the tray before they’re put into the bag, they’re easy to scoop out of the freezer bag when you need them. Your peppers should last in the freezer for a year.

Perks of Freezing Your Peppers

Freezing your peppers with this method is doing a favor for future you. You’ll be making a recipe in November that calls for peppers, and you’ll say to yourself, “I need a quarter cup of bell peppers, self!” Next thing you know, you’ll be reaching into your freezer and voila! The prep work of chopping your peppers has already been done! You’ll thank your past self and move on with your life.


Read more about Fail Better Farms!

Kale Cubes: The Answer You've Been Looking For

Why make them?

Kale is a healthy green. If your children are anything like mine, it’s sometimes a fight to get them to consume healthy greens. Kale cubes are a great solution for sneaking greens into other dishes like soups, sauces, or smoothies.

How to make them?

Simple! You seriously just blend kale leaves and water together. Then freeze. Here. I’ll make it look like a recipe so you take me seriously:

Ingredients and Materials:

  • 1 bunch kale (or other hearty leafy green)

  • 2-3 cups water

  • ice cube trays (or other freezable containers)

Directions:

  1. Remove kale leaves from stems, and place a few handfuls of kale leaves into blender.

  2. Add 1-2 cups of water to the blender.

  3. Blend kale and water until kale bits are pulverized.

  4. Take the blender jar off the blender base, and use a fork to scoop out the solid bits of kale and pack them into the cells of the ice cube tray. (At this point, leave the green juice in the blender jar.)

  5. Add a few more handfuls of kale to the blender, and pulverize again. (Add more water if needed to get the blender going.)

  6. Repeat steps 4 and 5 until all of your kale is blended up and the solid bits of kale are packed into ice cube trays.

  7. pour the green juice over the ice cube trays.

  8. After the kale cubes have frozen, store the cubes in a zip-lock bag in the freezer, and use within six months.

How to use them?

  • I’ve been adding 4-6 kale cubes to our morning smoothies, and I make sure to also add dark berries so the kids don’t notice the green color of the kale. So far, so good.

  • I added 6-8 cubes to a marinara sauce the other day, and no one was the wiser. Mwahaha!

  • I’m planning to tuck these cubes into soups as we move into the cooler months.

Watch My Video!


Learn More About Fail Better Farms

Source: failbetterfarms.com

Making Music

If you are a human being experiencing life on planet Earth, the past year has been a lot. What I know: 1) we all need community to get us through the rough patches of life, 2) music brings people together, and 3) spending time in nature is pretty wonderful for the soul, too.

Come Hang Out

If you like making music and sharing it with others, consider joining us here at Fail Better Farms for a mini hootenany. (You have no idea how much joy it gives me to type the word hootenanny.) We’ll be meeting outside social-distance style for laid-back musical fun. Just plug in your name and email address below to express interest, and I’ll send you an email with more specific details.

Give a Listen

Playing music with others can be intimidating, so I’ll make space for vulnerability by sharing first. Check out my original mom rock, complete with clucking chickens, screaming kids, and flat chords. After all, sometimes all you can do is fall apart at the seams and let a little song bleed out along the way.

14 Days of Kindness

DISCLOSURE: THIS POST MAY CONTAIN AFFILIATE LINKS, WHICH MEANS I MAY EARN A COMMISSION IF YOU CLICK A LINK AND MAKE A PURCHASE. FEEL FREE TO CHECK OUT MY DISCLOSURE POLICY FOR MORE DETAILS.

Countdown calendars are fun and add a spark of joy to each holiday. Our countdown to Valentine’s Day is one of my favorites because it’s all about spreading love and kindness. From February 1st until February 14th, we commit at least one simple act of kindness each day. Read on if you’re interested in trying this with your kid(s).

Why I Invest Time in This Lunacy

  1. We need to develop empathy in my house. A lot of the activities I include in our calendar focus on the well-being of others, so when we do these activities I make sure to ask Liv things like, “How would you feel if somebody did this for you?”

  2. My daughter is a resistant reader, so I try to regularly incorporate pleasant reading opportunities. Because we keep the hearts on display and Liv can choose which activity we do each day, she has incentive to read them.

  3. Several of my activities focus on bonding (with family members and friends, with each other, with the dog, etc.). In our busy lives, it’s easy to get caught up in our to-do lists, so it’s a priority for us to carve out time to connect.

Suggested Activities

  • Write a note to a friend telling him/her why s/he is awesome. Sign it or don’t.

  • Write a note to a teacher telling him/her why s/he is awesome.

  • Leave a note of kindness on a stranger’s windshield in a parking lot. (Consider what you’d like to read as you hop back into your car. Maybe try something like, “You can do this.” or “You are enough.” or “Life is tough, but so are you.”)

  • Call a relative or friend you haven’t talked to in a while to tell them you miss them.

  • Give Mom or Dad a back massage. (You like how I sneak in self-serving things like this?)

  • Donate nonperishable items to a food pantry.

  • Donate old towels and/or blankets to an animal shelter.

  • Help your parents clean the house.

  • Send a message to a favorite YouTuber to tell them you’re a big fan.

  • Make Valentines for your classmates.

  • Prepare your sibling’s favorite snack as a surprise. Perhaps arrange said snack into fanciful designs.

  • Play a game your sibling wants to play.

  • Do something good for your own heart. Go outside and run around. (Self-care is also kindness!)

  • Watch a cheesy love movie in a snuggle nest. (This is another one that’s pretty selfish on my part. I adore movies in snuggle nests! The cheesier, the better.)

  • Pay for the car behind you in a drive-thru restaurant. (It’s a good idea to ask how much they’ve spent first. I mean, we can spread kindness without being completely irresponsible.)

  • Take a bubble bath with candles and a champagne flute of sparkling juice. (This is one of Liv’s faves.)

  • Spend time petting, brushing, training or walking your dog.

  • If you’re in a position to donate money, donate to a worthy cause. (If you’re not in a position to donate money, don’t.)

  • If you’re interested in growing your own veggies this year, you might start planning your bed(s) now. (Salanova lettuce and turnip seeds can be planted in February in zone 7!)

  • Help make dinner for your family. (Might I recommend a heart-shaped meatloaf for Valentine’s Day dinner? It’s a tradition my mom started that I’ve had fun continuing.)

PXL_20210118_135843715.PORTRAIT.jpg

How to Make this Work for You

  1. Don’t plan things that feel hard because you won’t want to do them. Plan simple activities that are within reach and will make your kid(s) feel good.

  2. Post all of the hearts somewhere that your kid(s) can easily see them. (I posted mine above the windows in our breakfast nook so they’re out of the way but still easy to see and read. Bonus: you just decorated for the holiday.)

  3. Although this is a countdown to February 14th in our house, you might want to post more than 14 options in order to offer choice.

  4. If this feels like just one more thing that you should do but don’t have time to do, don’t do it at all! There’s not one right way to do parenting.

Fluffy, Egg-Free, Low-Gluten Pancakes

DISCLOSURE: THIS POST MAY CONTAIN AFFILIATE LINKS, WHICH MEANS I MAY EARN A COMMISSION IF YOU CLICK A LINK AND MAKE A PURCHASE. FEEL FREE TO CHECK OUT MY DISCLOSURE POLICY FOR MORE DETAILS.

PXL_20210110_124048735.PORTRAIT.jpg

Our son Collins is allergic to eggs, and he’s sensitive to sugar and gluten. Our daughter Olivia has no tolerance for food that is anything less than delicious. This creates a conundrum at mealtimes and means I have to modify pretty much any recipe I plan to use. Buckle up, dear reader, ‘cause you’re about the reap the benefits of my recipe-tweaking efforts. I hereby declare I have discovered the fluffiest, tastiest pancakes that suit the palates of picky eaters AND the dietary needs of folks with egg allergies and gluten sensitivity.

The Recipe

PXL_20210110_124120952.PORTRAIT.jpg

INGREDIENTS:
-3/4 cup milk
-2 tablespoons white vinegar
-1 cup flour (Today I used 1/2 cup wheat flour and 1/2 cup rice flour because when I use all rice flour my daughter gripes that “Mommy only makes us gross pancakes anymore.”)
-1 teaspoon baking powder
-1/2 teaspoon baking soda
-1/2 teaspoon salt
-1/2 teaspoon cinnamon
-1/4 cup applesauce
-1 teaspoon vanilla

The Directions

PXL_20210110_124032189.jpg

Step 1: Mix 3/4 cup milk with 2 tbsp white vinegar, and let the mixture sit for 5 minutes or so. (You’re not being punked. You’re DIYing buttermilk here. It’s gonna look gross, but I swear it’ll end up being a good decision.)

Step 2: Add the rest of the ingredients listed above, and mix. (Play jazz to get the consistency exactly how you want it. Add more applesauce or milk if it’s a little too thick for you. Add more flour if it’s too thin.)

Step 3: Grill ‘em up! I cook mine in butter on a cast iron pan, but to each his own.

Play with Your Food

PXL_20210110_124137088.PORTRAIT.jpg

I’m currently reading The Secret Life of Bees (I know. I’m two decades behind. Lay off me.), and last night I got to the part where May makes the “L” pancake for Lily. I says to myself…I says, “Self, let’s try that tomorrow morning.” So I did. Olivia was tickled to have her name spelled out in batter, so I fully endorse this type of food play when you have time on a weekend morning.

Now, you can go crazy searching pancake art tutorials on Youtube, and if you need a momentary escape from reality, I highly recommend you do. People have incredible skills, and there are worse ways to spend your time. However, for my “Olivia ♡” I just used a regular old spoon and got to it. Momma ain’t got time for squeeze bottle nonsense.

My Reality

The real kicker is that after making these modifications, Collins rarely eats any pancakes. Perhaps my efforts to make them Collins-friendly seem insane to you, as they do to me on occasion. However, because he sometimes chows down with us, I have to ensure our food is safe for him.

How to Make Your Bath Water Smell Like Heaven and Look Like Death

I’m all about trying to make stuff special for my kids. I’m full of these ideas on cute activities we can do together. Let’s make bath bombs! That’ll be a hit! Right?

Wrong.

If you follow the directions I followed, you don’t end up with bath bombs; you end up with bath sludge. It smells amazing, but it’s nothing that remotely resembles those cute spherical fizzy-producers that you’d actually want to give your kids. To see how hard I failed on this project, read my step-by-step guide below.

Ultimate Bath Sludge Recipe

Step 1: Mix together 1 cup baking soda, 1/2 cup epsom salt, and 1/2 cup cornstarch in a large bowl.

Step 2: Mix 2.5 tablespoons melted coconut oil, 3/4 tablespoons water, and 12-15 drops essential oils (I used equal parts clary sage, copaiba, and geranium, which created a divine blend.) in a medium bowl.

Step 3: Add the wet ingredients to the dry ones until they meet the consistency of a gooey slime.

Step 4: Slowly add 1/2 cup citric acid to the slime. Panic because the fizzing, which is supposed to occur when you pop these bad boys into the bathtub, is already happening. Uh oh.

Step 5: Attempt to form your sludge into spheres. Realize immediately that there’s no way this is going to work.

Step 6: Add more citric acid, baking soda, and salt in an effort to absorb the excess liquid. Cackle maniacally as your science experiment bubbles out of your control.

Step 7: Pivot. (Word of the year?) Decide maybe instead of making separate bath bombs, you can create a sheet of bath bomb matter that could possibly be salvaged if broken up after it dries. (Bath bomb bark is more seasonally appropriate anyway, right?) Spread the substance into a pan lined with parchment paper, and, while you’re at it, add some drops of food coloring just to see what happens. Sit the tray outside in an attempt to dry it. A little fresh air and sunshine might do it good, after all. (See image below.)

PXL_20201213_184714381.jpg

Step 8: After waiting over 24 hours and seeing the Plan B “bath bomb bars” were still the consistency of mud, throw up your hands and dump your strange creation into a cute jar. (See below.)

bathbombmess.jpg

Step 9: Shovel out a few clumps of the concoction under warm running water in the bathtub. Persistently yet lovingly shepherd your kids into the brown bath water.

Step 10: Field questions from your indignant kids and confused husband. (Ex: “Wait…what is that stuff? Why is it so hard to scrape out of the jar? Why is the bath water already dirty?”)

Lesson

I’m not Pinterest-worthy a majority of the time. (Those of you who know me best might laugh out loud at that understatement.) In all honesty, my mom-game can be best likened to a frantic round of whack-a-mole. However, I will do my best to lean into failing better. As far as I can tell, it’s the only way to live. No matter how this year blessed you or abused you, dear reader, may your Plan B bring you laughter.

Why We Have a Love/Hate Relationship with Failing

DISCLOSURE: THIS POST MAY CONTAIN AFFILIATE LINKS, WHICH MEANS I MAY EARN A COMMISSION IF YOU CLICK A LINK AND MAKE A PURCHASE. FEEL FREE TO CHECK OUT MY DISCLOSURE POLICY FOR MORE DETAILS.

If you’ve gotten this far with us, you know we legitimately have no business farming. (Despite our best efforts, though, we are actually getting better!) We’re committed to researching a lot and trying really hard. This fail better philosophy is both humbling and empowering. It repeatedly puts us in our place and reminds us we don’t have it all figured out. It also allows room for error; if you expect that failure is a likely outcome, it’s not so surprising when you come up against it.

Let’s be real, though. We don’t like failing. It’s uncomfortable and frustrating. It feels like the end of the world pretty much every time, but we try to lean into it because we know it’s good for us. It teaches us and makes us stronger. It prepares us for the next hurdle ahead of us that we may not see coming. We realize when we’re knocked down that it’s easier to see the trees rather than the forest. Indeed, we can usually only see the forest retrospectively.

Exhibit A

I posted a blog literally a week ago (Is a Great Pyrenees Right for You?) about how we were so proud of our dog Samson for his growth as a guardian of our free-range chickens. Can you guess what we woke up to this morning? A dead chicken. And there is absolutely no doubt our boy Samson is responsible.

Our Reaction

How do we respond to this setback? We initially feel deflated. We dabble in impostor syndrome, wondering why we think we have any business raising a livestock guardian dog.

Then we try to learn from the failure by asking questions. Is this our boy’s way of showing us he needs more supervised interaction with the birds? Is this a sign that we shouldn’t add to our flock? Should we put the electric fences back up that divide the chickens from the dog?

SamsonCloseUp.jpg

Disappointing set backs like this happen every day around here. If there’s not a wonky fence post needing to be replaced, then a couple dozen eggs got cracked when somebody tripped, or the carrot seeds aren’t germinating as expected. Aaron and I take turns reassuring each other that we’re following our dream and that hiccups are a part of growth and learning.

And sometimes we don’t have a crystal clear path to fixing the problem. We just keep trying different things and hoping for the best. It’s exhausting and disappointing and rewarding. It’s freaking life.

The Overwhelm

Little fails have a way of adding up to a death of a thousand cuts, right? They make life feel overwhelming. You wonder if you’ve bitten off more than you can chew. Moving forward feels as sensible as tidying up the Titanic. What’s the point?

When you’ve invested so much of yourself into your dream, it’s really disappointing to stomach road blocks. I know you know, reader, because everybody living on planet Earth in 2020 knows. Today it’s a dead chicken, but who knows what tomorrow holds? And there are only so many dead chickens a person can take. (I apologize if a dead chicken metaphor offends any of you.)

Attempting to Reset Mindset

We are repeatedly reminding ourselves that we’re grateful for our problems. That we get to deal with them together as a team. That they are problems that are completely within our power to overcome. That we learn and grow so much through dealing with them.

But a fail still feels like a sucker punch sometimes.

Adventures in Dietary Changes (Plus a Bonus Peach Cake Recipe!)

Disclosure: This post may contain affiliate links, which means I may earn a commission if you click a link and make a purchase. Feel free to check out my disclosure policy for more details.

PeachCake2.jpg

Raising a kid with food allergies is tough. You pretty much have to develop a manual for your kid that you can drop off to babysitters along with the backpack full of inhalers, epipens, over the counter antihistamines, creams for rashes, and safe snacks. My husband Aaron and I went through years of treating the symptoms of our son’s allergies. We never got ahead of them; it was always a game of catch up.

Then we made a change. We were lamenting our plight to friends of ours, who happened to have an answer. They said, “You have to take your son to this nutritionist who helped a bunch of people in our family.” We agreed, “We absolutely do.” So we did.

The Cut-Everything Diet

The nutritionist said we first have to cut out all sugar, all wheat, and most caffeine from our son Collins’s diet, and she recommended we then feed Coll a no mold/low histamine diet. While I was in her office, I mentioned I’ve suffered from bad environmental allergies for the entirety of my existence. She said if Coll and I both go on this diet and take it seriously, my son can wean himself off his inhaler and I can wean myself off my daily prescription antihistamine.

Some of the foods and drinks we were challenged to cut on this new diet included cheese, chocolate, corn, white potatoes, nightshades, and all food additives. All fermented things were also discouraged, which is interesting because we were previously told by multiple medical professionals that yogurt and kombucha would be beneficial for my son.

In an attempt to simplify how many meals we’d be cooking and avoid teasing Collins with foods he can’t consume, Aaron and I decided we would all stick to this diet.

Results

Collins’s skin has cleared up for the first time in his life! And his dad, mom, and sister are feeling pretty great as a result of our cleaner eating.

Holy Crow! It’s Expensive.

The highly recommended nutritionist we visited didn’t accept insurance. After paying for the office visit, DNA test kits, and supplements, we spent over $750. I realize that’s a lot, and I wouldn’t expect most people to be willing to drop that amount. Desperate for results, we were willing to make an investment, and this particular nutritionist was highly recommended.

The cost of groceries has also increased. It’s just more expensive to buy rice pasta in place of semolina. And all of those flour and sugar substitutes are way more expensive than the sinfully delicious originals.

It’s Time Consuming

Gone are the days of grabbing ready-made meals and snacks off the grocery store shelves. As far as I can tell, nearly all prepared foods contain additives, some form of sugar, corn, wheat, or white potato. That means I spend far more time in the kitchen concocting meals.

In order to save myself time in the long run, I’ve been batch cooking. For example, if I’m baking sweet potatoes for dinner, I’ll bake 2-3 times as many potatoes as our family will eat in one sitting. I do the same thing with steel cut oats, quinoa, jasmine rice, and other grains that become the basis of future meals. Although some information online says leftovers should be avoided by folks on a no mold diet, there’s no way this diet is sustainable for us if I don’t batch cook.

Figuring Out Substitutions

It’s been really hard to find recipes that account for the dietary needs in our home. (Along with the list of foods we’ve recently cut, my son is allergic to nuts and eggs.) I have no choice but to play jazz with existing recipes and just see if they work out. Last night I created the original recipe below, which turned out okay. I’m not going to lie: replacing sugar, eggs, and white flour with other foods will not please all crowds. You can totally tell the difference. But if you’re avoiding processed foods like us, this might hit the spot for you.

Semblance of a Peach Cake

Ingredients

3/4 cup unsweetened applesauce

1 1/2 cups local honey

1 cup olive oil

1 cup cassava flour

1 cup quinoa flour

1 teaspoon salt

1 teaspoon ground cinnamon

1 teaspoon baking soda

2 1/2 cups peeled, pitted, chopped peaches

Directions

  1. Preheat oven to 375 degrees F while you grease two 8” x 4” pans.

  2. Combine all above ingredients by hand in a big bowl.

  3. Pour batter into prepared pans, and bake at 375 for 40 minutes.